Mouse Trap Cars: Attaching The Mouse Trap
Learn various ways to attach a mousetrap to your vehicle so you can make changes and adjustments later. Construction tips for building a winning mousetrap racer.
Stop gluing the mouse trap to the chassis. The problem with gluing the mouse trap directly to the chassis is that you cannot make any adjustments to the position of the mouse trap there after. In most situations you can use some small bolts to secure the mouse trap to the frame for a less than permanent solution. After testing your mousetrap racer you may find out that you have to adjust the length of the lever arm in which case you will also need to reposition the mouse trap on the chassis. If the mouse trap is glued directly to the frame you will not be able to reposition the mouse trap as needed so changing the length of the lever arm will not produce the results desired.
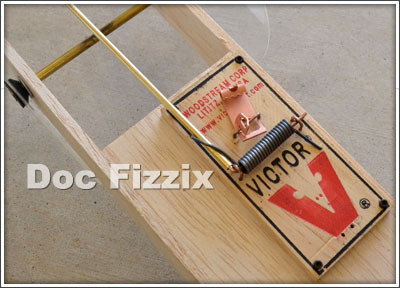
bonus tip: here the mouse trap is attached to the chassis with four Doc Fizzix hold down bolts instead of glue so that the mouse trap can be repositioned if needed.
Positioning the Mouse Trap
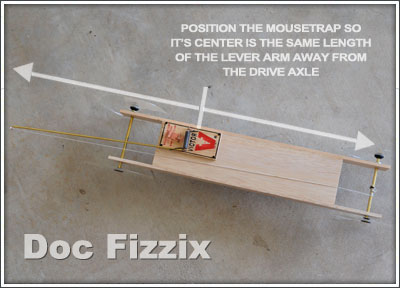
For maximum performance the mouse trap needs to be positioned on the chassis so that the lever arm is directly above the drive axle. In order to find the correct placement of the mouse trap on the chassis hold down the lever arm into the fully wound position and then line-up the tip of the lever arm so that it is just reaching the drive axle. Make sure to position the mouse trap so that the lever arm travels along the center of the vehicle and does not hit anything.
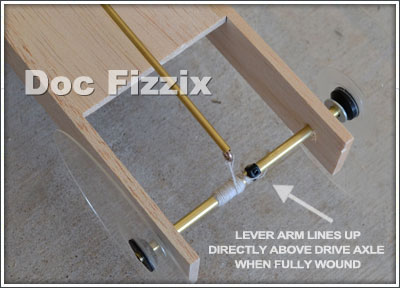
bonus tip: the mouse trap is positioned on the chassis so that the tip of the lever arm lines up with the drive axle when the mouse trap car is fully wound-up.
bonus tip: to find the correct position for the mouse trap, hold down the lever arm and line-up the mouse trap on the chassis.
Attaching the Mouse Trap
For optimal performance the mouse trap should be positioned on the chassis so that the tip of the lever arm falls directly above the drive axle when the mouse trap is in the fully wound position (as pictured bellow). If the mouse trap is not aligned properly with the drive axle energy will be wasted off the start. After testing your mousetrap racer you may discover that you need to adjust the pulling force by changing the length of the lever arm. When ever you adjust the length of the lever arm you will also need to reposition the mouse trap on the chassis this is why the mouse trap should not be glued but instead held in place with some type of adjustable anchor system.
bonus tip: here the mouse trap is attached to the chassis with four Doc Fizzix hold down bolts instead of glue so that the mouse trap can be repositioned if needed.
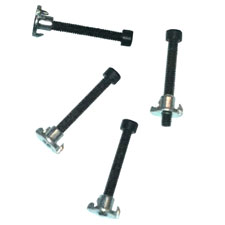
bonus tip: We have a special set of hold down bolts that we have selected for use with all our mousetrap vehicles. These lightweight bolts come with a special locknut that will anchor it's self into the chassis to make it easy to remove, reposition, and even replace the mouse trap.
Doc Fizzix Hold-Down Bolts
Using a 7/64-inch drill bit, drill four holes in the corner of a mouse trap. Mark the position of the mouse trap on the vehicles frame and then using one of the bolts make an indentation on the vehicles frame or using the holes just drilled in the mouse trap as a template and drill the corresponding holes in the frame using the same 7/64-inch drill bit. Attach the mouse trap using the hold down bolts and that is it you are done!
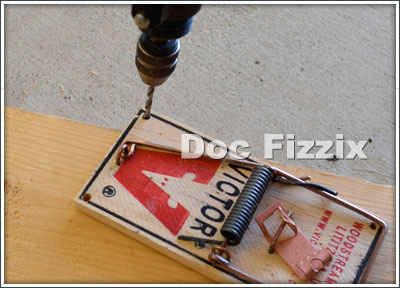
step #1: drill four holes in the corners of the mouse trap.

step #2: Use the holes in the mouse trap as a template to mark where to drill the holes for the mouse trap.
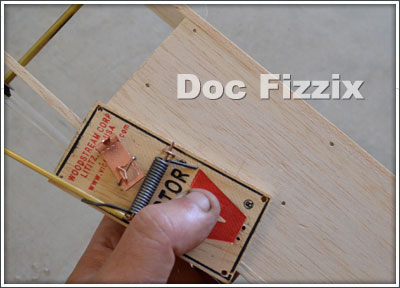
drill points: The markings show where to drill the frame so that the holes of the mousetrap are lined up on the frame.
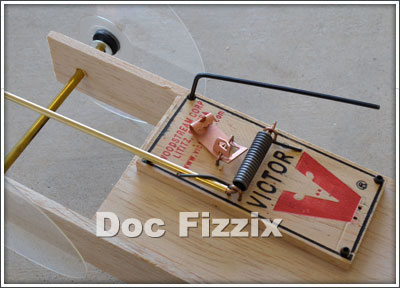
step #4: Attach the Doc Fizzix hold down bolts through the mouse trap and the chassis. If needed, the mouse trap can be repositioned by repeating the steps above.
Attaching With Zip-Ties
On some frames zip-ties can be used to secure the mouse trap and will allow for repositioning and adjustments. Four holes are drilled through the mouse trap and the zip-ties are then placed through the holes and around the frame.
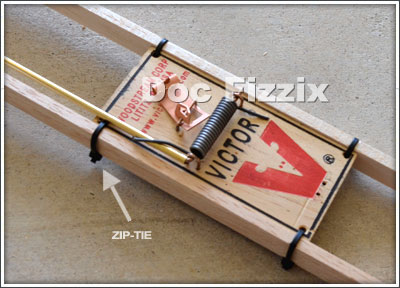
bonus tip: The mouse trap is attached to the chassis using zip-ties.
*Can't find what you're looking for? Ask Doc Fizzix »