Mouse Trap Cars: Adjustable Steering
One of the biggest problems with a mousetrap racer is getting it to go straight down a narrow hallway. Learn how to add adjust steering to your mousetrap vehicle.
Building a mousetrap car that travels straight can be challenging especially when building a long-distance traveling mousetrap vehicle where any small deviation from straight is exaggerated over a long distance. Most mousetrap car contest are performed in the narrow hallways of a school where going straight is extremely important or else the mousetrap vehicle will end up running into a wall long before it reaches it's maximum travel distance. If your mousetrap car does not travel straight energy is also being wasted to over come the force of friction turning the vehicle's wheels. If a mousetrap vehicle is not traveling straight then there is one reason and one reason only: the front and rear axles are not parallel to one another! It may be possible that a road is so uneven that a mousetrap car will not travel straight but instead follow the slops and curves of the road surface even if the axles are parallel to one another; but then rest assured that all competitors will have to deal with this same scenario and the best advice is to learn to "play the curves" of the surface like a golfer on a putting green.
the situation: if the axles of a mousetrap racer are not parallel to one another the mousetrap vehicle will turn and/or go off course.
Adjusting The Steering
Once you have built your mousetrap vehicle it will be hard to adjust the steering unless the vehicle was originally designed with an adjustable steering system. It is always best to think about steering before you build your mousetrap car but if your vehicle is already assembled and you cannot play the curve successfully there are some tricks that will help you get things straight.
Play the curve
If your mousetrap car does not have adjustable steering built into the design then the best advise is to learn to "play the curve" and maximize the travel distance over the curving distance. If your mousetrap racer is turning to the left then aim your vehicle to the right at the start line in order to compensate for the curve in order to extend the travel distance over the longest possible curve radius. If a mousetrap car is turning left do not just point the vehicle straight down the hall, this will only cause the vehicle to turn into the wall much sooner than pointing the vehicle slightly to the right and extending the curve distance.

bonus tip: if a mousetrap car turns left, aim the vehicle to the right at the start line in order to play the curve.
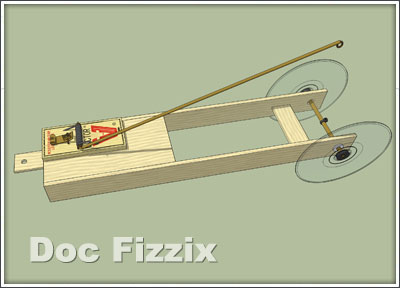
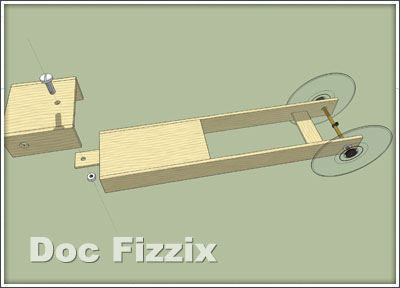
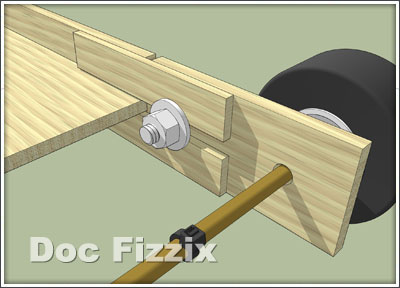
Swivel Steering
It is always best to design your mousetrap vehicle with adjustable steering before you build your vehicle but steering can be added later if needed. Our Basic Kit II is an extreme long-distance-traveler that comes with adjustable steering. The Basic Kit II comes ready-to-assemble with pre-cut and pre-drilled parts so all you have to do is start gluing and start racing the same day. The basic concept behind the adjustable steering on our Basic II kit is to build one set of axles on a swivel that can be turned separately from the main frame of the vehicle. Small adjustments can be made to the alignment of the axles by turning the swivel in order to make sure the mousetrap racer travels straight. This same concept can be used for long-distance and speed-trap mousetrap racers alike.
the basic II: our basic ii kit uses an easy to understand adjustable steering set-up.
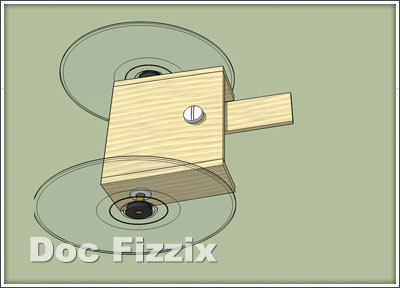
bonus tip: one set of axles is attached to a swivel base that can be turned in order to adjust the steering. A light-weight bolt can be locked in place to prevent random movement of the swivel set-up one the steering is set.
bonus tip: A swivel base is attached to the main frame.
bonus tip: The whole swivel assembly is attached to the swivel base with a plastic bolt and nut that can be hand tightened.
Frame Stretching
In this method you will cut the frame and add an adjustable extension. On the same side that the vehicle is turning, you will cut the frame so that it can be stretched and adjusted. This can be added after a vehicle is already built but it is always best to plan to have adjustible steering before you make your vehilce because it is always harder to add steering after construciton.
the design: a frame adjustment is added to one side of the vehicle.

the parts: cut one of the side rails on the side that the vehicle is turning. Parts include some scrap wood, a plastic bolt and nut combo, and the cut part of the side rail.
how it works: the scrap wood is glued to the main from and the cut section is secured by the plastic bolt. The cut section can be moved forward or back in order to adjust the steering.
The Quick Fix Method
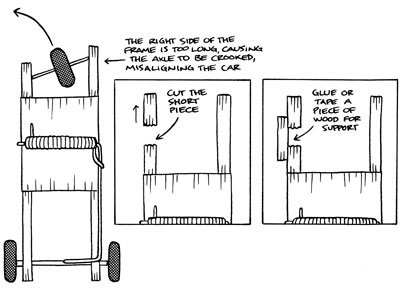
If your mousetrap car is already build and it would be hard to add a swivel set-up then the only other solution is to fix the alignment of the axle the hard way. Depending on the direction that your mousetrap vehicle is turning, you will need to bring the axles back into alignment. If a mousetrap racer is turning to the left it is because the front axle is pointed slightly left or the distance between the front and rear axles is greater on the right side of the vehicle (see picture bellow).
The quick fix method requires some modification to the front axle hole on the side of the vehicle that is opposite to the direction the racer is turning. From our example, a mousetrap vehicle turning left, the axle hole on the front right is going to be adjusted to straighten out the front axle. Using a small round file, remove some of the material on the back side of the axle hole on the right front in order to bring the axle hole closer to the rear and get the front axle pointed straight. Only remove small amounts of material and test run the mousetrap vehicle until the racer eventually travels straight. It will not matter that the hole is large of the front side since the axle gets pushed to the back as the vehicle moves forward.
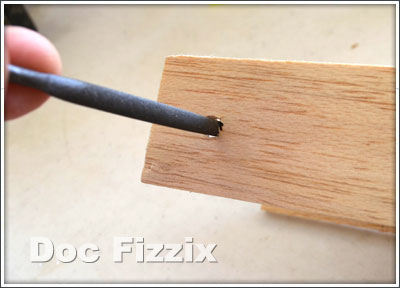
bonus tip: a file is used to remove material and align the front axle holes. File the back of the front axle hole on the side of the frame opposite the direction the vehicle is turning.
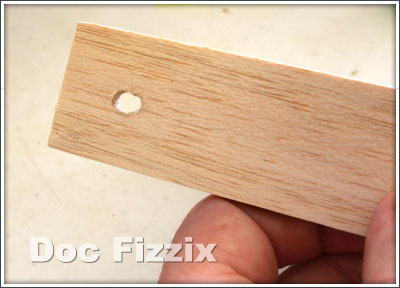
bonus tip: Once the axle holes are in alignment the mousetrap vehicle will travel straight.
*Can't find what you're looking for? Ask Doc Fizzix »